运费仍然是决定客户在线购物行为的主要因素之一。尽管在电子商务中运输是不可避免的,但购物者通常希望尽量减少他们在这方面的花费。
运输成本不仅会影响转化率,还会影响客户保留率和购买量。
作为 WooCommerce 店主,提供优化的运费可以极大地使您的业务受益。您可以采用的一个简单技巧是提供统一运费。
这种运输方式已被证明是仅次于免费送货的第二大首选方式。
电子商务统计数据显示,消费者不喜欢结账时的惊喜。由于意外的运费,28% 的在线购物者放弃了购物车。
提供统一运费意味着您的客户预先清楚地了解运费。
幸运的是,WooCommerce 允许您设置统一运费。在本文中,我们将向您展示如何在您自己的商店中进行设置。
我们将考虑所有默认的 WooCommerce 统一运费选项。然后我们将查看一些其他选项以及可用于将它们添加到商店的插件。
但在我们这样做之前,让我们来看看更接近的统一运费。
What Flat Rate Shipping Is and How It Works in WooCommerce
Flat rate shipping involves charging a fixed, uniform fee to ship an item or package. The flat rates can be based on weight, volume, or the location of the buyer.
For example, you can decide to charge $5 for shipping to all buyers shopping from Chicago. Alternatively, you can set a flat fee of $10 for every order under 5kg with a volume not exceeding 0.5 cubic meters.
Unlike standard shipping, buyers no longer need to pay for each unit weight they buy or unit distance traveled to deliver their order. If properly implemented, this shipping method is often more cost-effective, especially for shipping heavier items.
The majority of shipping carriers already offer flat rate shipping. For example, USPS Priority Mail flat rate includes Flat Rate Envelope, Legal Flat Rate Envelope, and Small Flat Rate Box. Each of these packages has its specific dimensions and weight limits.
In WooCommerce, you can deliver the same benefits to your customers.
Flat rate shipping is one of the three shipping methods available by default. You can attach a flat rate fee to a particular shipping zone and then charge this amount per order or shipping class.
The shipping class feature adds a lot of flexibility. Similarly, you can set advanced cost rules such as a minimum or maximum charge and a percentage-based fee.
We’ll show you how to utilize all these features in the body of this article.
Let’s take a look at the default flat rate shipping options WooCommerce offers.
How to Set Up Flat Rate Shipping In WooCommerce
To get started with flat rate shipping in WooCommerce, you’ll need to select the shipping method from the three options available out of the box.
Before you can select a shipping method, WooCommerce first requires you to set up a shipping zone. This makes sense since shipping is location-based.
Before diving into your flat rate shipping settings, we recommend that you back up your website and update your themes and plugins. We would also suggest you use a staging site for initial setup to ensure the customer experience is not impacted.
You can find more details on this in our universal guide to setting up WooCommerce shipping options.
Let’s jump into the WordPress dashboard and see how flat rate shipping works.

Hello! My name is Sujay and I’m CEO of Astra.
We’re on a mission to help small businesses grow online with affordable software products and the education you need to succeed.
Leave a comment below if you want to join the conversation, or click here if you would like personal help or to engage with our team privately.
Step 1: Add or Edit a Shipping Zone
Shipping zones refer to geographic locations or regions. With WooCommerce shipping zones, you can apply specific shipping options that will be available to customers shopping from these regions.
To create a new shipping zone or edit an existing one, go to WooCommerce > Settings > Shipping and click Add shipping zone.
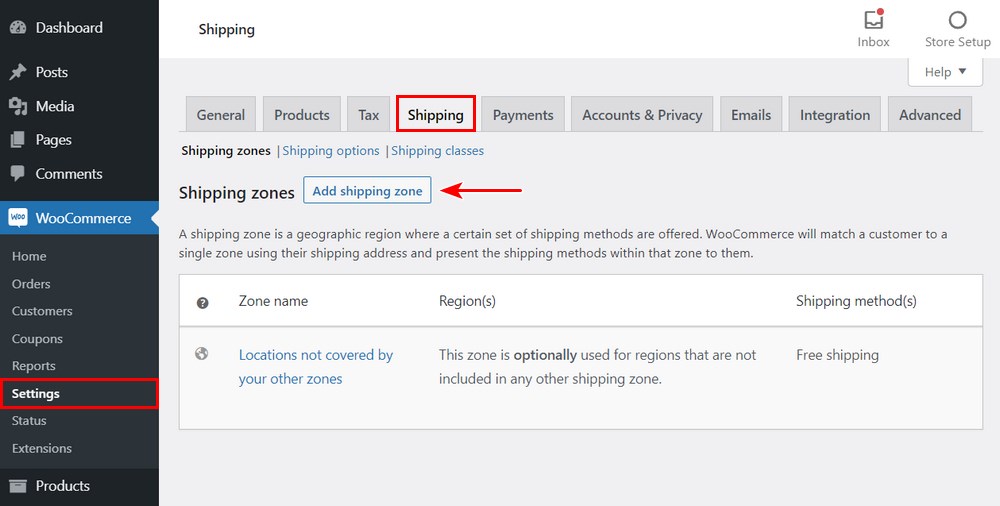
Originally, WooCommerce automatically created two zones after a fresh activation of the plugin: “US” and “Non-US.”
Now, you’ll only find a Locations not covered by your other zones entry as the default listing. The rules for this zone will apply each time you ship to a location not included in your existing shipping zones.
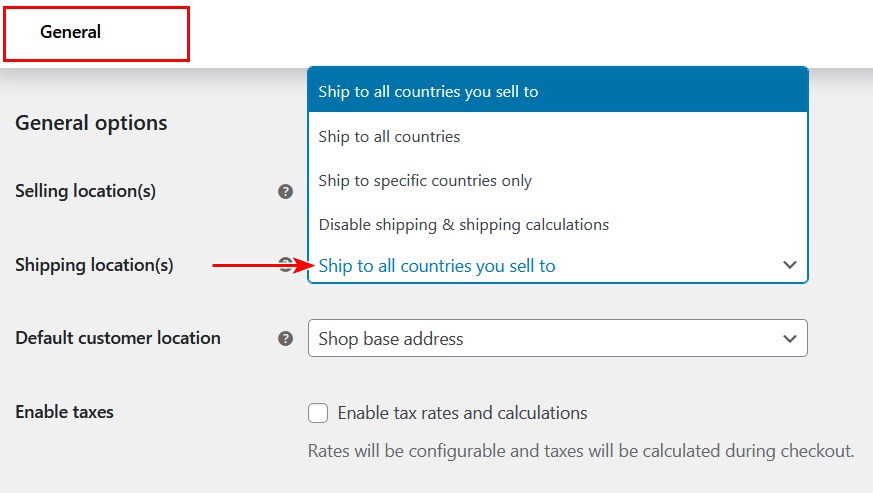
If, for some reason, the Shipping tab doesn’t appear on the WooCommerce settings page, you need to first re-enable shipping for your store.
You can do this by navigating back to WooCommerce > Settings > General. Under the General options section, you’ll find the Shipping location(s) field.
Here, select the option that matches your shipping needs, anything other than Disable shipping & shipping calculations.
Return to the shipping settings page: WooCommerce > Settings > Shipping. Then click Add shipping zone. This will redirect you to the shipping zone editor.
Here, fill in the available fields to match your shipping specifications.
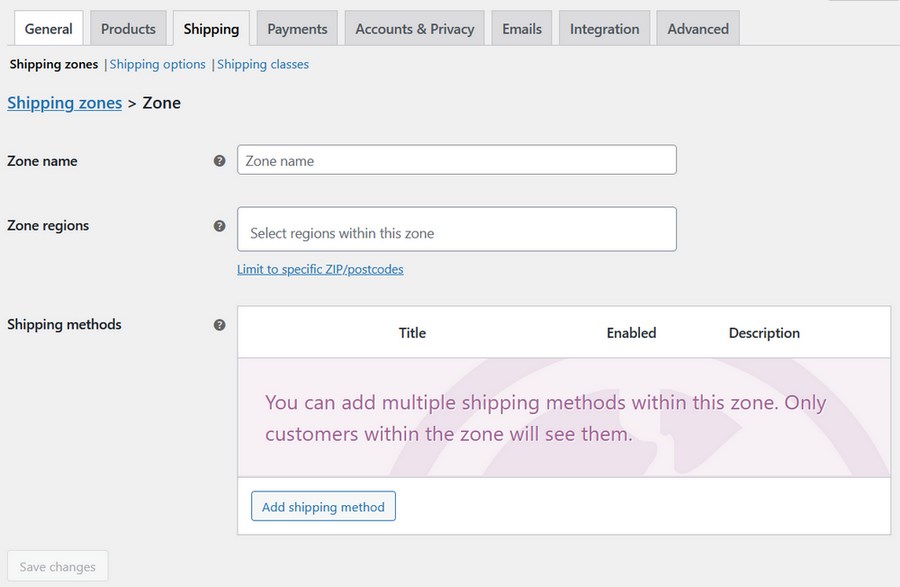
The Zone name simply refers to a short descriptive title for your new shipping zone.
All the locations you want to add to the shipping zone should go into the Zone regions field.
You can add a city, state, country, or continent by searching or selecting from the list in the dropdown menu.
Alternatively, use individual postcodes or a numeric range such as 90210…99000 to add new locations.
Step 2: Add a New Flat Rate Shipping Method
Now that you’ve created a shipping zone, you need to apply new shipping methods for buyers in that zone. You can do this on the same zone editor page.
Click Add shipping method. This triggers a pop-up menu that allows you to select a shipping method of your choice.
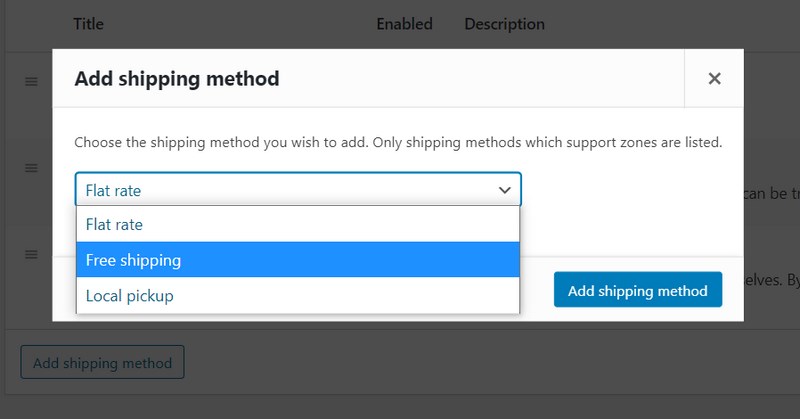
WooCommerce sports three shipping methods by default: free shipping, flat rate, and local pickup. You can add as many shipping methods as you like to each shipping zone.
In this case, select Flat rate and then click Add shipping method.
To add more shipping methods in the future, go to WooCommerce > Settings > Shipping > Shipping zones.
Hover over the shipping zone you want to add or edit its shipping methods and click Edit.
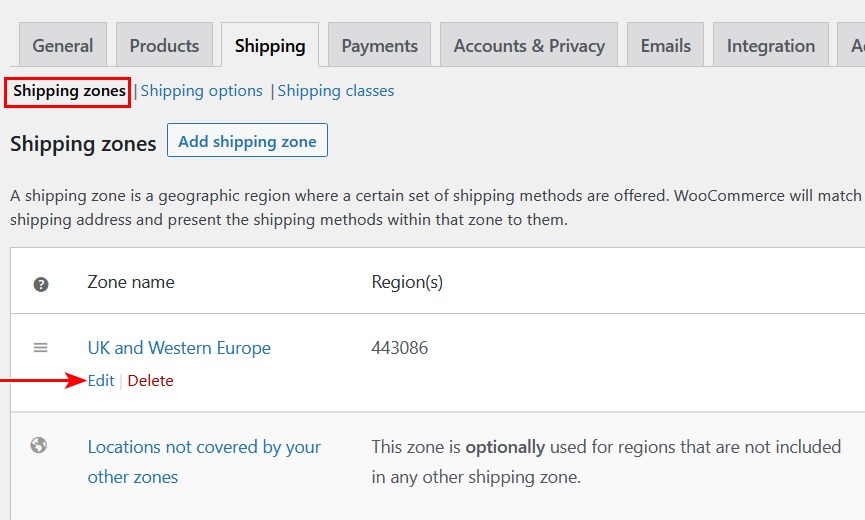
You’ll then be redirected to the shipping zone editor.
Finally, you need to tweak your flat rate settings to ensure that you’re offering customers all the flexibility they love.
Step 3: Edit the Flat Rate Shipping Settings
To edit flat rate shipping settings, hover over the method you want to edit under the Shipping methods and click Edit.
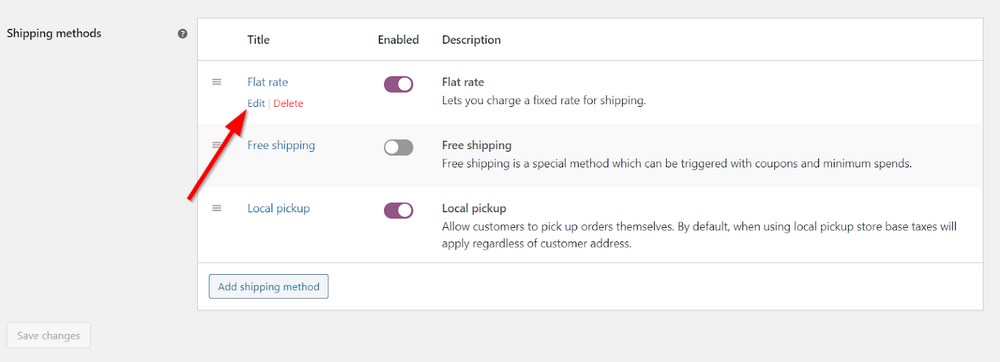
On the next page, you get to set the method title, tax status, and shipping cost.

The Method title is the name of the shipping method visible to the buyer during checkout. This is particularly useful if you’ll be offering multiple flat rate shipping methods in the same shipping zone.
For example, you can use names such as “Priority Shipping” or “Expedited Shipping.”
To effectively implement multiple flat rate shipping methods in the same shipping zone, you’ll need to set up shipping classes. We’ll talk more about this in a later section.
The Tax status field lets you decide whether the shipping fee is taxable or not.
The last field, Cost is where you enter the flat shipping fee (exclusive of tax.) There’s a lot of room for customization here.
Advanced Flat Rate Shipping Cost
WooCommerce allows you to set advanced cost rules based on five variable placeholders:
- [qty] – The number of items in the cart.
- [fee] – An additional fee after a basic shipping fee is charged. This variable relies on three other placeholders.
- percent – An additional fee equal to a percentage of the total order cost.
- min_fee – The minimum amount that can be charged as an additional fee. Particularly useful when using percentages.
- max_fee – A maximum amount that can be charged as an additional fee.
Using these placeholders, here are three common examples of advanced costing scenarios:
- Standard flat rate shipping: Input a simple digit such as 10 to charge a fixed rate on all orders from that zone (shipping will cost $10.)
- Additional fee per item quantity: Input 10 + (2 * [qty]). Shipping will cost $10 plus $2 for each cart item.
- Additional fee equal to percentage of cart total: Input 10 + [fee percent=”2” max_fee=”100”]. The base cost of shipping is $10 plus 2% of the cart total (the maximum additional fee is $100.)
Once you’re satisfied with the final cost rules, click Save changes.
Extending Flat Rate Shipping Options Using Shipping Classes
Implementing flat rate shipping properly requires charging the right fee for shipping a product based on certain criteria. These criteria could be weight, package dimensions, and volume.
To help WooCommerce classify products properly and charge the correct fee during checkout, you’ll need to put them into pre-defined groups.
These groups are called shipping classes and contain similar products in terms of the criteria mentioned earlier.
Using them, you get to charge differently for shipping products in different categories. Shipping classes also help you charge a flat rate for some products and offer free shipping for others.
To create new shipping classes, go to WooCommerce > Settings > Shipping > Shipping Classes and click Add shipping class.
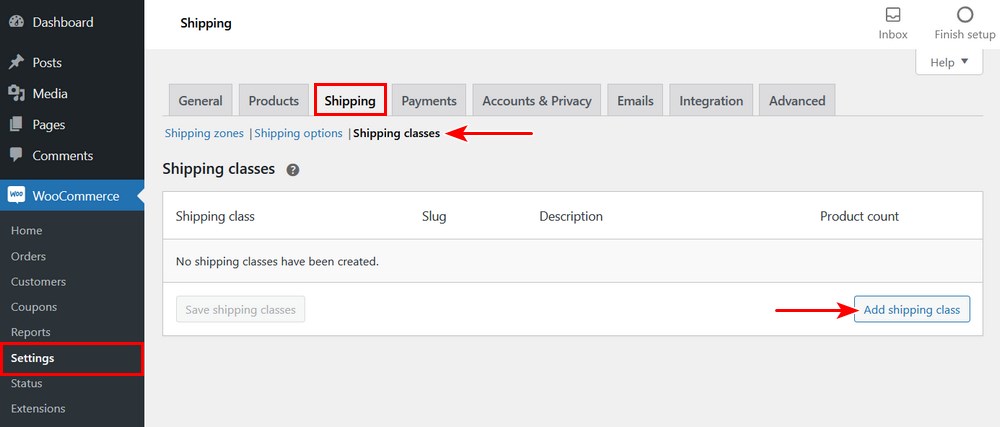
Now, you can fill in the shipping class name, slug, and a description for the class. The slug is simply a unique identifier. Leave the field blank if you want the system to generate a slug automatically.
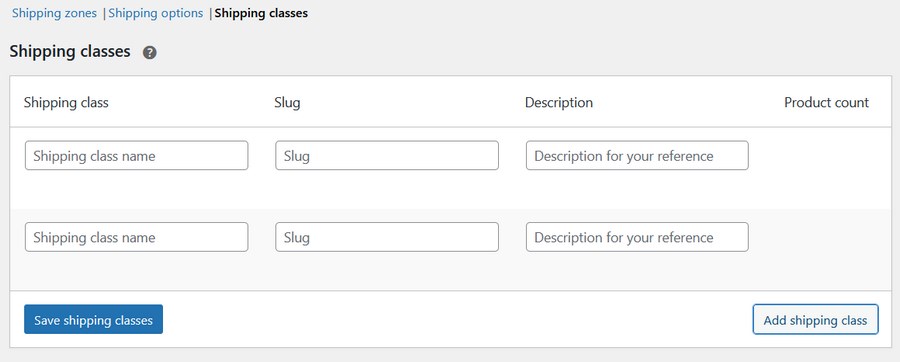
You can add multiple shipping classes by clicking the Add shipping class button. Afterward, click Save shipping classes to save your progress.
After adding shipping classes, you can now attach specific flat rate shipping costs to them.
To do this, navigate back to WooCommerce > Settings > Shipping > Shipping Zones and click edit while hovering over any existing shipping zone.

On the next page, scroll down to the Shipping methods section and click Edit under the flat rate method you want to edit.
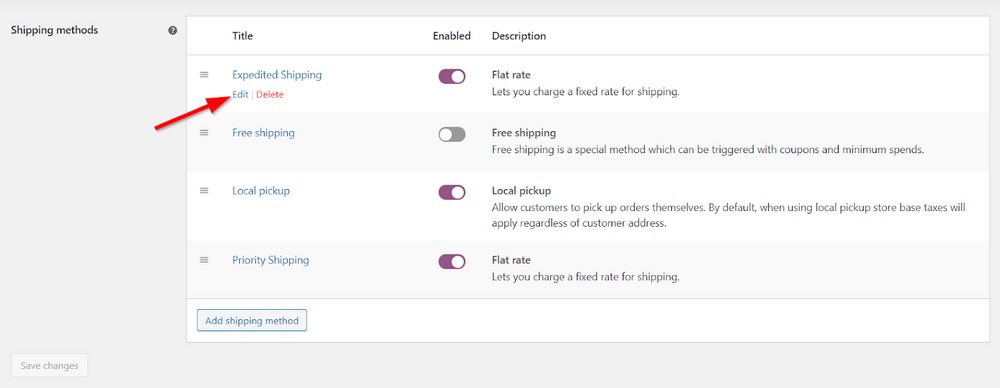
On the flat rate settings page, you’ll see that a new Shipping class costs section has been added.
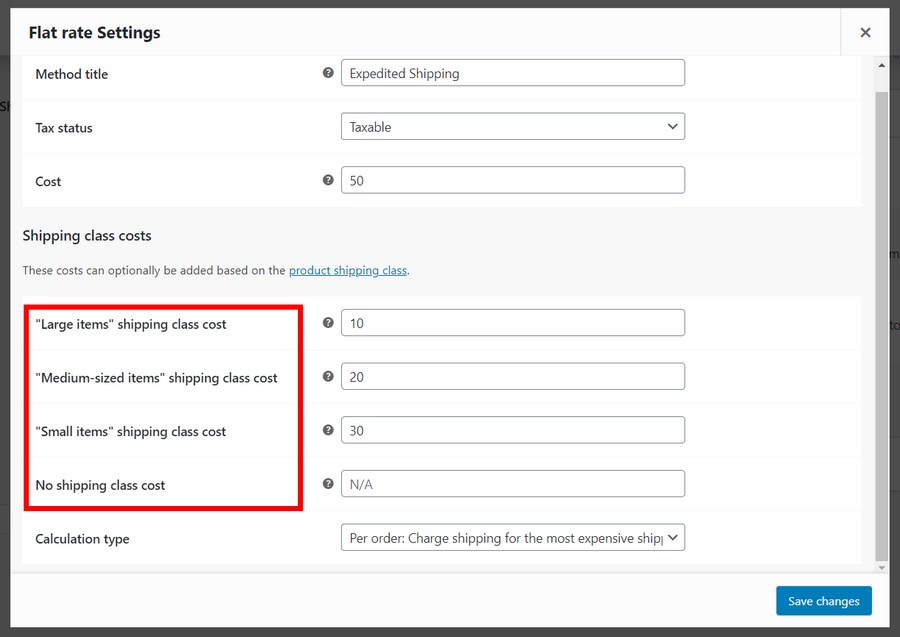
Here, you can add unique shipping costs for each shipping class. The No shipping class cost field allows you to add a fixed shipping cost for all products without a shipping class attached. If you leave it blank, the cost indicated in the upper Flat rate Settings section will apply.
If you want to offer free shipping for a shipping class, input 0 in the cost field.
Shipping Class Cost Calculation Type
Another important element of flat rate shipping is deciding how you want the shipping cost to be calculated at checkout.
After adding shipping classes to your store, WooCommerce lets you choose from two calculation types.
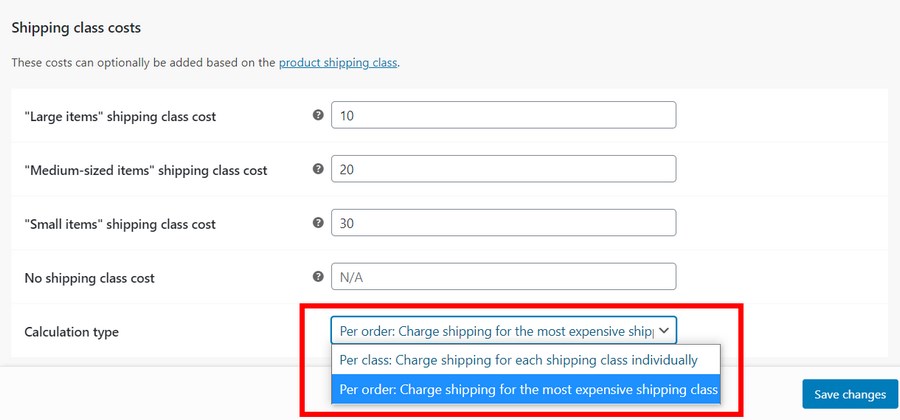
- Flat rate per class: This option allows you to charge individually for each shipping class included in the buyer’s cart.
- Flat rate per order: Alternatively, you can decide to charge a flat rate for the entire order based on the most expensive shipping class in the cart. This option is often more economical for the customer and can boost purchase quantities per order.
After making your selections, click Save changes.
These are all the default flat rate shipping options you can explore in WooCommerce. We’ll show you other options such as flat rate box shipping you can add using additional plugins later on.
Step 4: Assign Shipping Classes to Products
To get your shipping classes to work properly, you need to assign them to individual products. If you have already added products to your store, you can easily edit them.
Otherwise, assign these shipping options directly while adding a new product.
To do this, locate your product settings by going to Products > All Products or Products > Add New.
On the product settings page, scroll down to the Product data section. We’re only concerned with the Shipping tab.
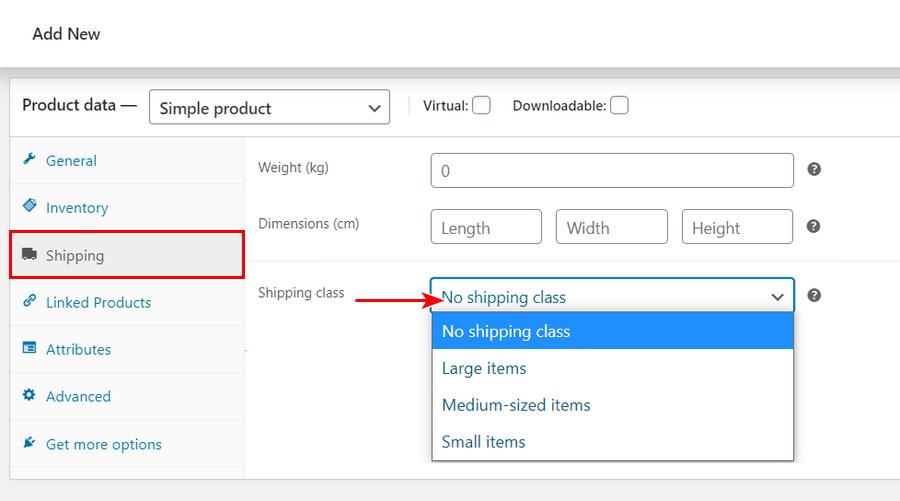
On this screen, you can select any shipping class of your choice for the product. This way, all its flat-rate cost rules will be applied to the product automatically.
You can also add a shipping class to multiple products while bulk-editing them.
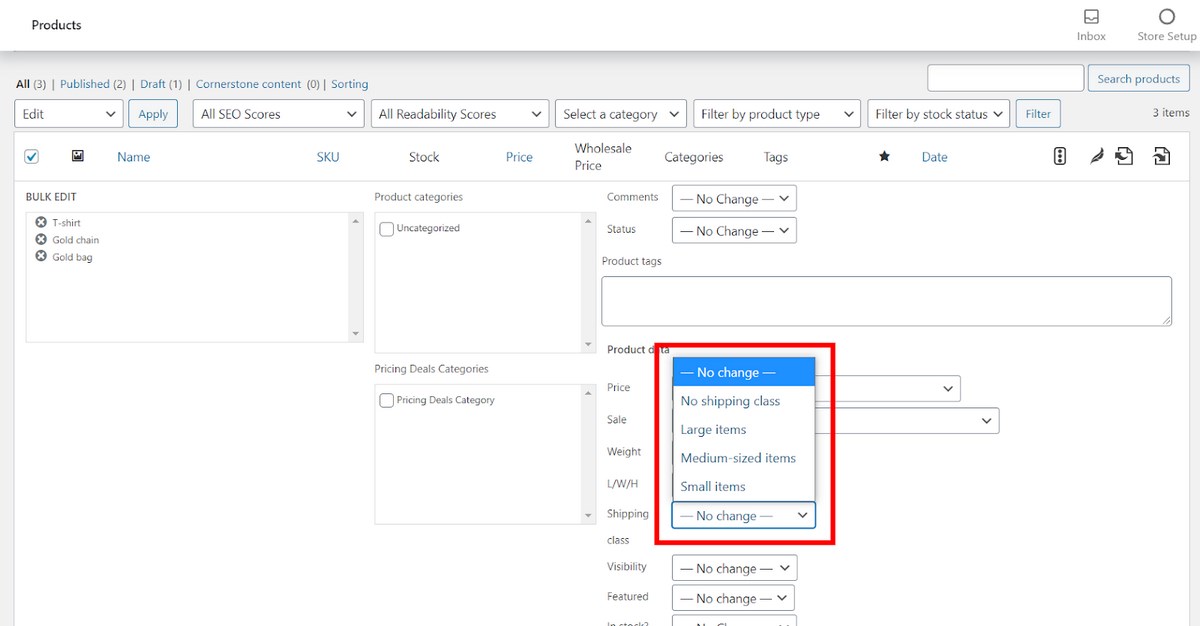
At the moment, these are the only two ways to assign shipping classes to products. Hopefully, we’ll be able to add products to a shipping class while editing the shipping class in the future.
Step 5: Test Your Flat Rate Shipping Setup
Having set up your flat rate shipping options and shipping classes, you need to test them to see the final results on the front-end. This is particularly important if you’re using a staging site.
Testing your flat rate shipping setup involves confirming if the rates displayed at checkout match your specifications.
To do this, navigate to your front-end by clicking Visit Store in the administrator panel of your WordPress dashboard.
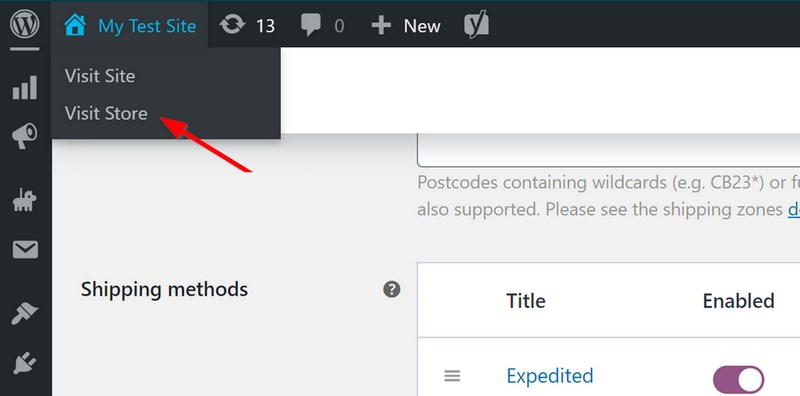
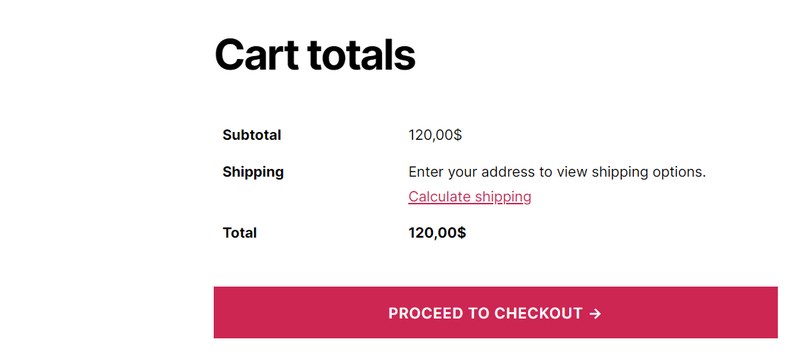
On the front-end, add as many products as you like to the cart and go to the cart. In the cart, click Calculate shipping.
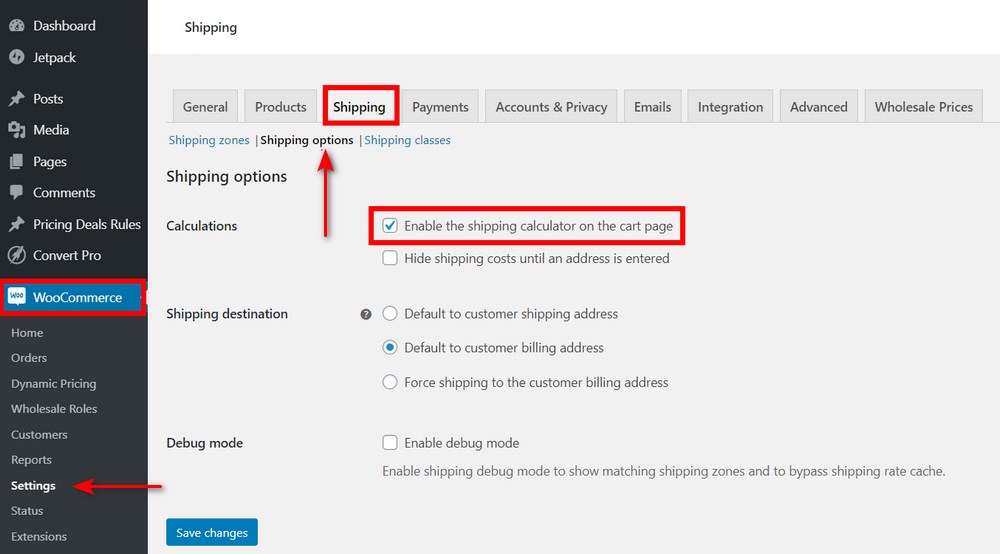
Depending on your selection in your WordPress dashboard (WooCommerce > Settings > Shipping > Shipping Options), this link may be unavailable.
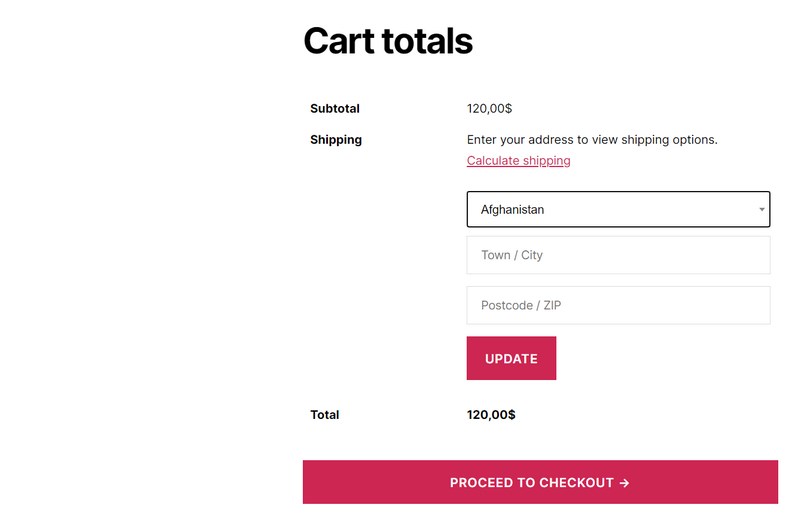
Enter any location in any of your store’s shipping zones and click Update.
All the shipping methods and rates available in that shipping zone will now be displayed.
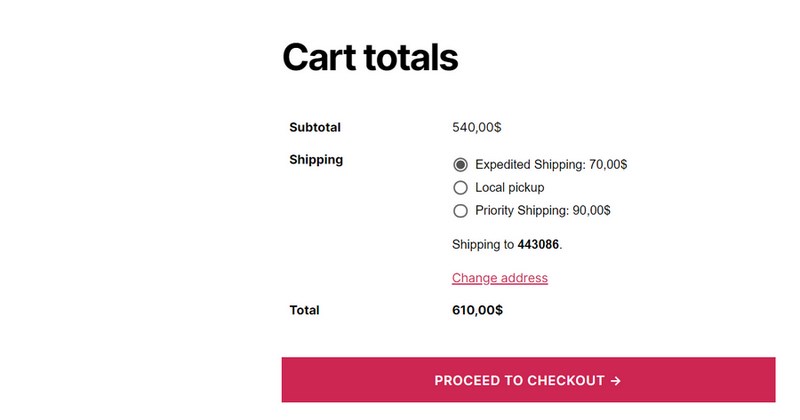
If you’re satisfied with the rates displayed, click PROCEED TO CHECKOUT and your flat rate shipping is finally set up.
Otherwise, you’ll have to go back to your WordPress dashboard to figure out where the error is.
Creating Custom Flat Rate Shipping Options in WooCommerce
Besides the default WooCommerce flat rate shipping options we’ve highlighted above, you can add other additional features using third-party plugins.
One of the most popular tricks these plugins can help you deliver is flat rate box shipping. This method involves grouping similar cart items into packages or boxes that have their own dimensions and shipping requirements.
The Flat Rate Box Shipping plugin sports a ‘box packer’ that helps you do all the calculations involved accurately.
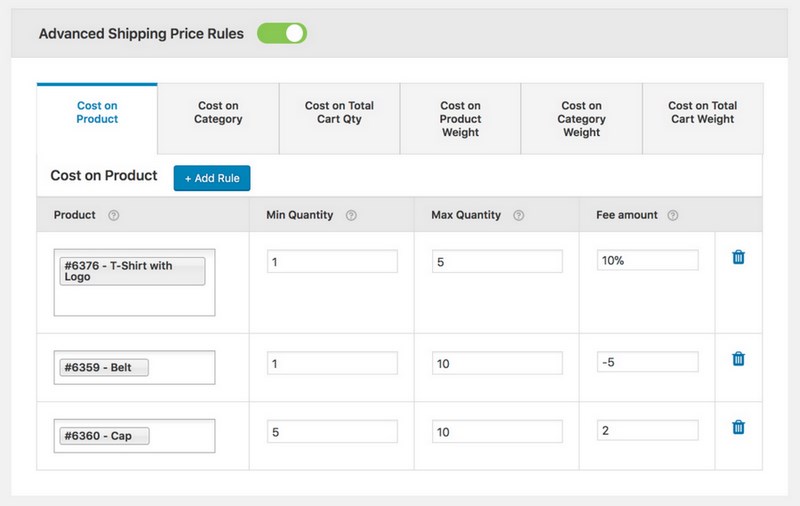
Another very powerful plugin to try out is Advanced Flat Rate Shipping for WooCommerce. It extends the number of rules and conditions you can attach to every flat rate shipping method significantly.
For example, you can make shipping rates product-specific, user-specific, or even cart-specific (based on cart quantity, total cart weight, and cart subtotal before and after discount.)
We’ll walk you through some of these extra features when discussing the best WooCommerce flat rate shipping plugins.
If you’re feeling really hands-on and possess the technical resources, you can even code your custom shipping method. This will require knowledge of PHP code, WordPress hooks, and the shipping method Application Programming Interface (API.)
Best WooCommerce Plugins for Flat Rate Shipping
Now that we’ve established how much utility flat rate shipping plugins can deliver, let’s examine some of the best solutions we can readily recommend.
1. Advanced Flat Rate Shipping Method for WooCommerce
Advanced Flat Rate Shipping Method is easily the most powerful plugin for extending flat rate shipping options around. From configuring conditional rules to setting time-based shipping costs, the plugin helps you customize your shipping rates as intelligently as possible.
Using this tool, you get to offer a near-unlimited array of flat rate shipping conditions.
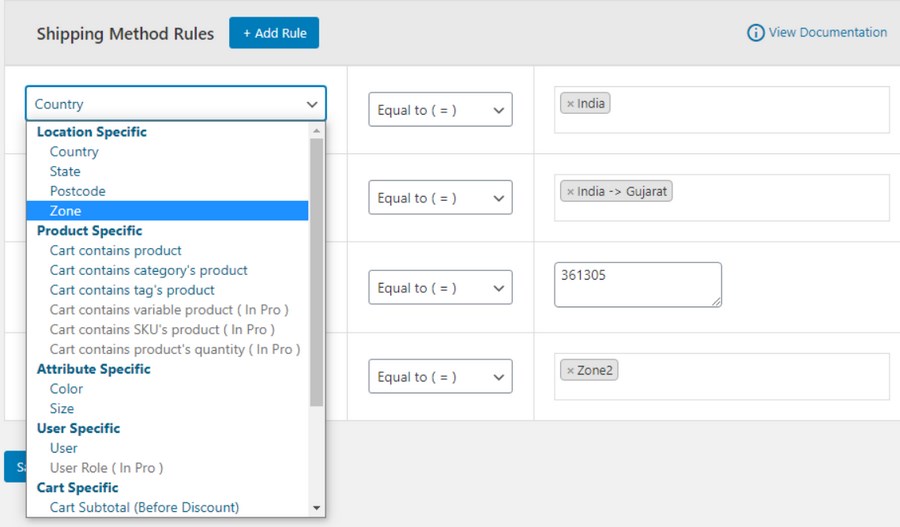
To make these conditions easily accessible, they are classified into seven basic groups:
- Location-based: This feature allows you to apply specific shipping rules to individual locations within a shipping zone. This way, you can offer unique rates for buyers in a location without having to create a new shipping zone. This condition could be country-based, state-based, or postcode-based. It’s ideal for setting up special rates for certain states or cities in a country.
- Product-based: There are also cases when you want to apply different rates each time a shopper includes a particular product in their cart. The product-based rule is not limited to simple products only. You can add product variations, categories, tags, and Stock Keeping Unit (SKU) as well.
- Attribute-based: This option lets you apply shipping method rules to a buyer’s cart whenever it contains certain product attributes such as color, size, and type.
- User-based: Here, you can restrict special rates to logged-in users and others to guests. If you have existing user roles such as wholesaler, contributor, and customer, you can apply tiered shipping rates as well.
- Cart-based: Another option is to tie shipping rates to conditions such as cart total before and after discount, cart quantity, and cart weight. Furthermore, new rates can be applied each time a coupon is activated or a shipping class is included in the cart.
- Payment method based: Whether it’s PayPal or Stripe, you can apply shipping rules each time a buyer chooses a particular payment method.
- Pricing-based: This final option improves on WooCommerce’s advanced cost rules. Here, you can add individual products to the rules and charge shipping based on the product costs.
